interfaceFormFieldUIProps { value: string | number | boolean; label: string | ReactNode; componentType: ComponentTypeEnum; name: string; // unique parentField: string; // it will save other field name // The componentsProps should from field component. e.x the select component should has options; required?: boolean; componentsProps: Props }; typeFormUIStruct = FormFieldUIProps[];
type validForm = () => { [key in keyof FieldValueCollection]: message; } | undefined type submitForm = () =>void; type resetForm = () =>void; // we want change run some actions when the value updated in path type getValueByPath = (path: keyof FieldValueCollection) =>FormFieldUIProps['value'];
我们在开发中,经常会遇到引用一些公共函数的需求,但是,如果引用的层级太深,难免会出现形如
import moduleFunc from '../../../../../utils/getData'的路径。这样的路径,可读性差,并且如果出现整体目录迁移并且引用该功能的文件非常,会使得这些文件都出现修改。
所以一般我们都会使用形如import moduleFunc from @utils/getData;的方式进行优化。
nested relationships exist in the grouping and there is no
theoretical upper limit to the depth
Drag and drop elements out of the grouped list to create grouping
relationships
ungrouped elements can be dragged into the group to create new
grouping relationships
When ungrouped list items are moved, they will automatically cross
over the group and its subcomponents
When ungrouped list items are grouped, the relative order before
grouping should be maintained
when grouped list items are ungrouped, the relative order before
grouping should be maintained
the above operation should also be valid for the direct operation of
grouping (here the grouping is also operated as a list item) ##
Analysis
Due to Objectives 1&5, the data structure should be kept in a
one-dimensional structure, i.e. in the form of an array of objects. Such
a data structure provides the base order of list items and facilitates
maintaining the relative order of list items when creating
groupings.
For objectives 2&3&5&6, the relative position of the
grouped list items within the group should be recorded when calculating
whether to create/update/delete grouping relationships for drag and drop
items, to facilitate sorting the position of the list when the grouping
relationships change
For Objective 7, grouping should be included as one of the list
items. Provide the "type" field as a distinction between grouped list
items and other lists, for possible expansion of the grouping
expand/collapse function.
Render the list with a multi-dimensional structure to facilitate
recursive rendering of the list, friendly to jsx syntax. ## Data
structure design
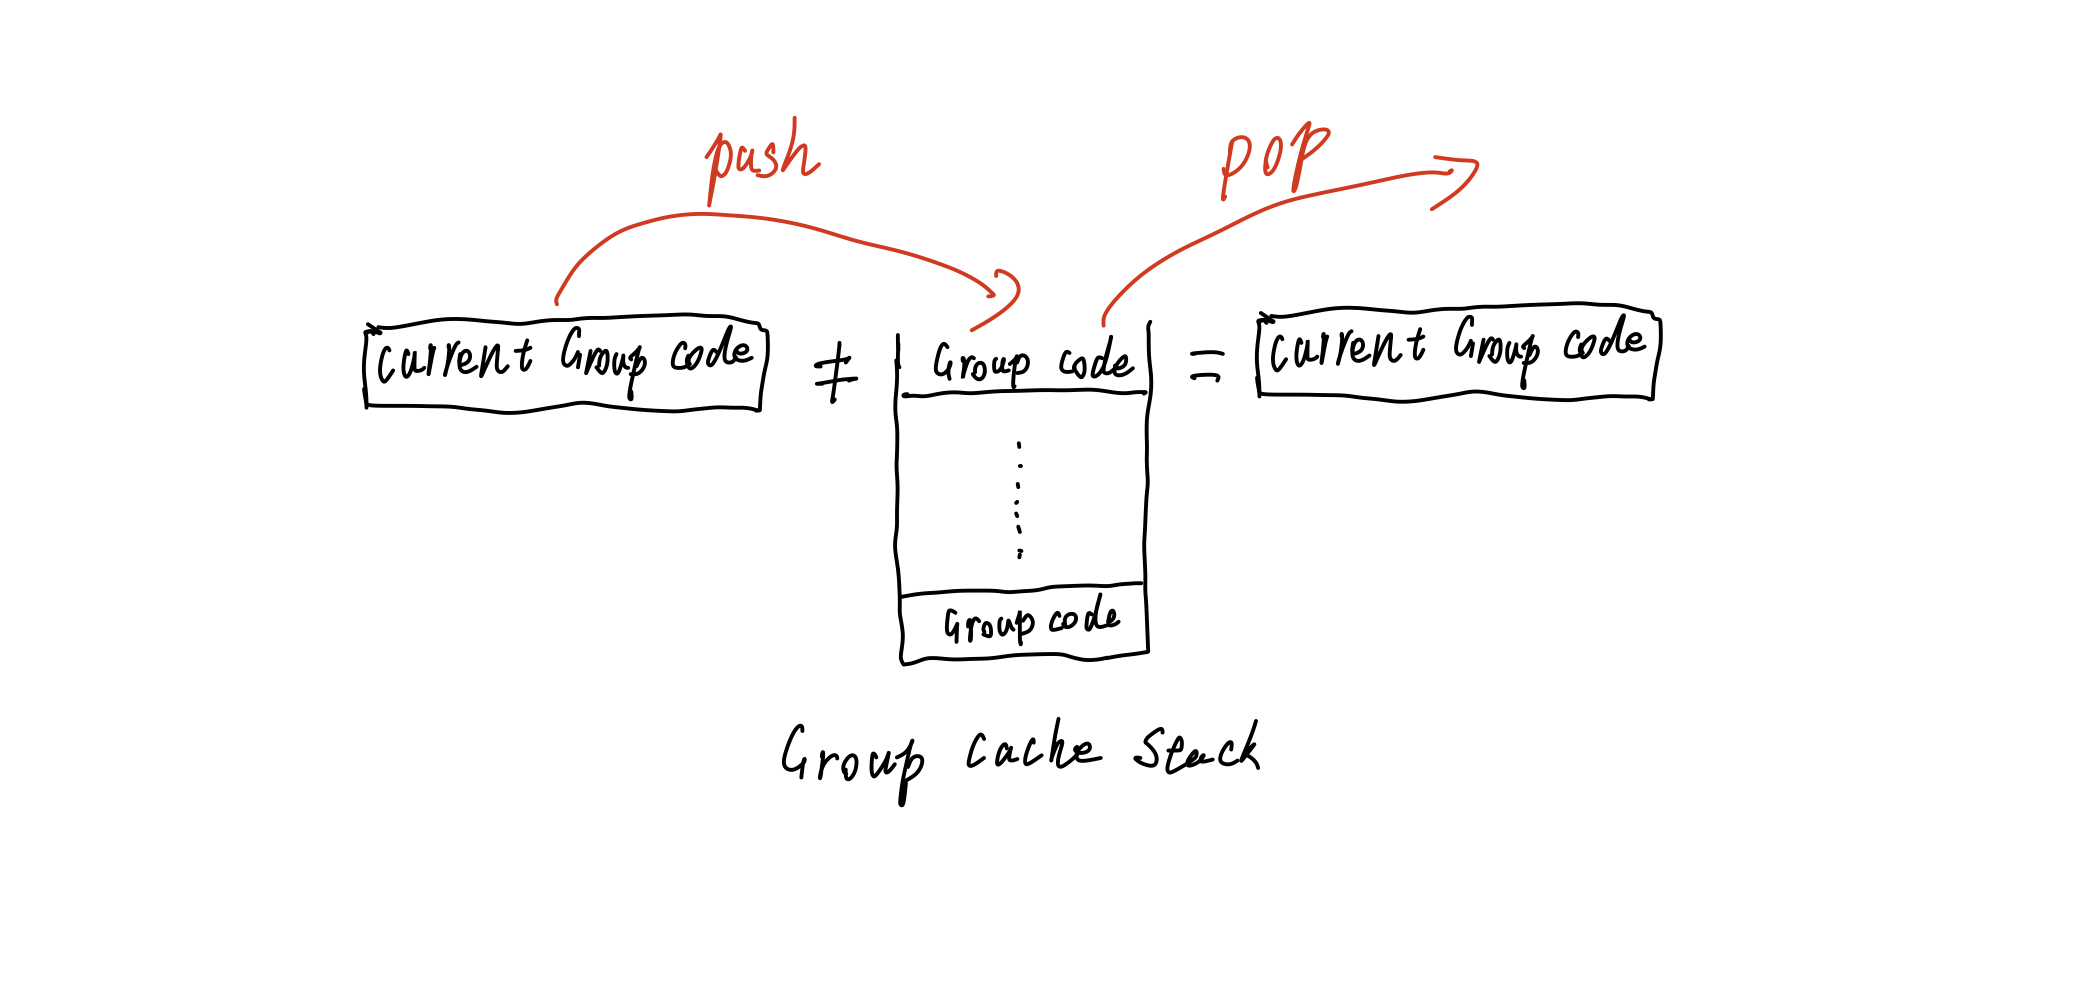
typeGroupStack = { groupCode: string; index: number; // the real subscript of the group offsetNumber: number// the length of the group, for recording the relative position of the list items in the group }[]
One-dimensional
object arrays into nested structures Design.#
Detect group closure,The algorithm is a variant of the bracket
closure algorithm.
If the group-code field in the current list item is not equal to the
code at the top of the stack, the group is closed and the current stack
top element is popped.
/** * Convert a one-dimensional array to a multi-layer structure * @param compCodes The code of all components * @param compDatas the data of all components * @returns returns the nested structure associated with code, the */ const subList = (compCodes: string[], compDatas: JDV.State['compDatas']): AssistStruct[] => { letgroupStack: GroupStack[] = []; constresultData: AssistStruct[] = [];
conststackPop = (groupCode?: string) => { let len = groupStack.length - 1; while (len >= 0) { if (groupStack[len].groupCode ! == groupCode) { groupStack.pop(); } else { break; } len--; } };
constsetResult = (result: AssistStruct[], groupStack: GroupStack[], groupCode: string, value: AssistStruct) => { groupStack.forEach((item, index) => { if (!result) { returnnull; } if (!result[item.index]) { return; } if (result[item.index].code ! == groupCode) { // If the current component's group is not equal to the key in the result, search down returnsetResult(result[item.index].childrenasAssistStruct[], groupStack.slice(index + 1), groupCode, value); } else { if (result[item.index].children) { (result[item.index].childrenasAssistStruct[]).push(value); item.offsetNumber += 1; } else { result[item.index].children = [value]; } } }); };
compCodes.forEach((item, index) => { const hasGroup = compDatas[item] ? compDatas[item].config.groupCode : undefined; stackPop(hasGroup); if (compDatas[item].compCode === 'group') { if (hasGroup) { // If the current component's parent is at the top of the stack, update the result tree setResult(resultData, groupStack.slice(0), hasGroup, { code: item, children: [], });
// if the current group has a parent group, the group stack must not be empty, and the group index is the parent group length-1 // debugger; groupStack.push({ groupCode: item, index: groupStack.length ? groupStack[groupStack.length - 1].offsetNumber - 1 : index, offsetNumber: 0, }); } else { groupStack = []; //no group, empty stack resultData.push({ code: item, children: [], }); //If the current group has no parent group, the group stack must be empty and the group index is the result length groupStack.push({ groupCode: item, index: resultData.length - 1, offsetNumber: 0, }); } } else { if (hasGroup) { // If the current component's parent is at the top of the stack, update the result tree setResult(resultData, groupStack.slice(0), hasGroup, { code: item, }); } else { groupStack = []; //no group, empty stack resultData.push({ code: item, }); } } }); return resultData;
Translated with www.DeepL.com/Translator (free version)
Gepostet vor Aktualisiert vor project8 minutes lesen (Über 1217 Wörter)
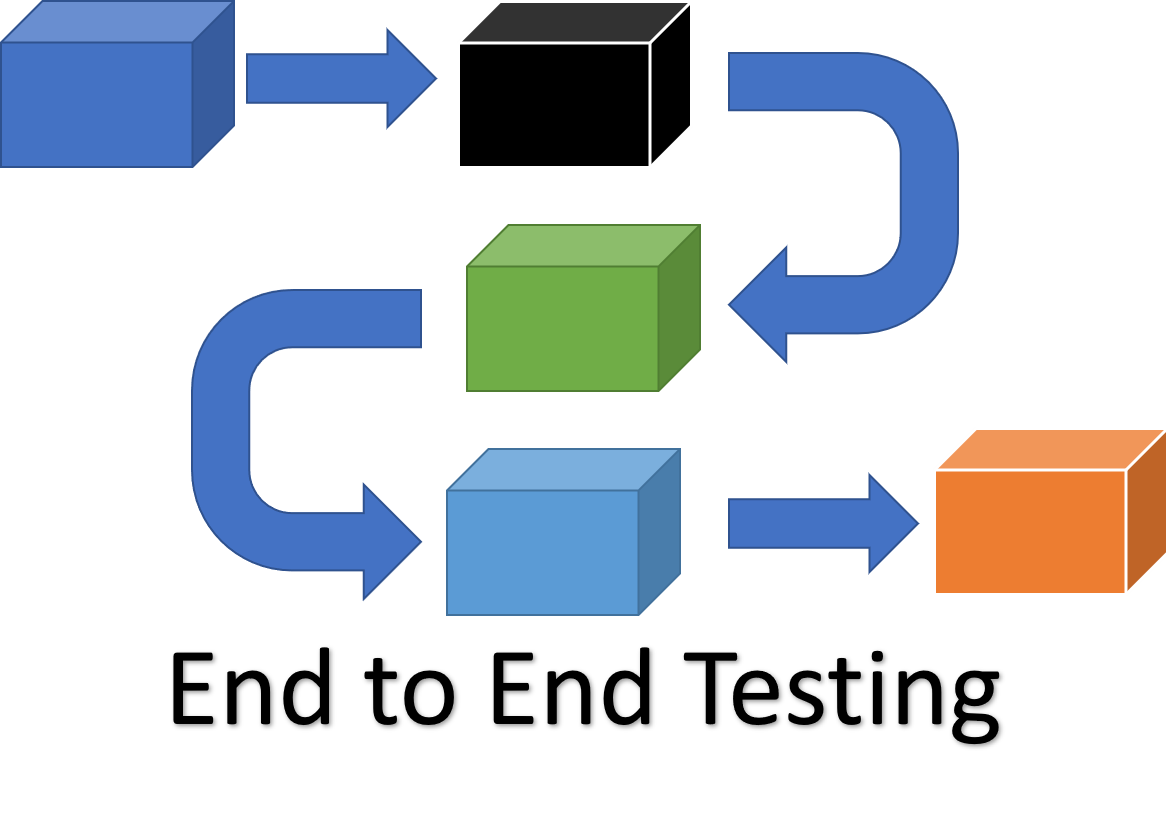
I recently work in the field of front-end data visualization, and the
need for some monitoring of long-running front-end pages comes up. In
the past, my solution was to record through some existing platform on my
personal PC via browser, or an earlier approach was to record through
some screen recording tools.
In such an approach, the following problems were often
encountered.
Insufficient resolution to restore
The recorded log format is difficult to parse
Need to open the personal computer for a long
time
** What is recorded through the platform is often not a video, but a
DOM-Mirror recording. Such logs are difficult to share with others for
troubleshooting**
DOM-Mirror recordings for playback lack value for rendering
real-time data returned by the backend (because the point in time has
been missed, and playback cannot play back the service state of the
backend at that time)
The number of concurrent recordings is limited by the
performance of personal computers
The
main problems that this solution circumvents to solve are.#
The use of getDisplayMedia is limited by the browser's
protocol. This api is only available when the access protocol is https,
and the recording of audio depends on other api.
The performance of getDisplayMedia has little room for
optimization when recording multiple pages concurrently, and the most
fatal problem is that the performance overhead of the recording process
is borne by the browser. This means that if the page itself is more
performance sensitive, it is basically impossible to record the page
running properly using this api.
puppeteer's frame-by-frame screenshots are limited by
chrome-devtools itself, resulting in only 10+ images being cut out a
second. In a data visualization scenario, a large amount of real-time
data rendering is obviously unacceptable as well.
use node call xvfb, create virtual desktops: open source library
node-xvfb has some problems, the virtual desktops created,
seem to share the same stream buffer, in the case of concurrent
recording, there will be a situation of preemption, resulting in
accelerated video content, so the need to encapsulate a new node call
xvfb
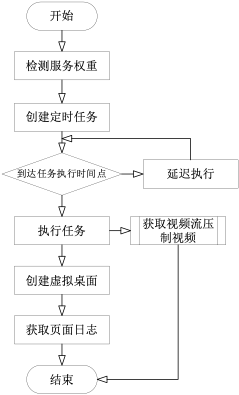
Load balancing during concurrent server recording. This feature
is to solve the problem of high server CPU load when recording video
encoding concurrently. So to maximize the number of concurrent
recordings, I record the number of tasks being and will be performed by
each server, mark this number as the weight of the service, and when a
new recording task is created, first check the weight of the current
server, then create the recording task on the server with the lowest
weight, and lower the weight when the recording is completed and the
task is manually terminated.
The api call causes chrome to pop up an interactive window to
choose which specific web page to record. Closing this window requires
the following parameters to be enabled when starting puppeteer
A: In the tried and tested solution, getDisplayMedia requires the
runtime environment to provide a desktop environment. In the current
solution, it is necessary to push the video stream from xvfb directly
into ffmpeg
Q: Why are there certain memory requirements?
A: To provide the minimum running memory for chrome
Since the quadratic Bézier curve will have only one bend after
drawing, it will render poorly when multiple nodes are connected. And at
45°, 135°, 225°, 315°, special treatment is needed, otherwise the curve
obtained is too large in radian.
After deciding to use the cubic Bezier curve, we need to calculate
the two control points C1,C2 when drawing the curve, and then draw it by
CanvasRenderingContext2D.bezierCurveTo.
Since we need two control points, we will divide the line
S-E between the starting point SP(start
point) and the end point EP(end point) into 4
parts. The following points are obtained.
\[
\begin{align*}
Split_{m} = (\frac{(X_{SP}+X_{EP})}2,\frac{(Y_{SP}+Y_{EP})}2)\\
\end{align*}
\] The formula L(x) for S-E is obtained as \[
L(x) = \frac{X_{Split_{m}}}{Y_{Slit_{m}}}x
\] From L(x) we know that the slope of S-E satisfies \[
\tan \theta = \frac{X_{Split_{m}}}{Y_{Slit_{m}}}
\]
Then, using \[Split_{m}\] as the
origin of the coordinate system and establishing the right angle
coordinate system, we get