高性能分组列表设计-2

通过改变列表项位置更新分组关系#

要解决的问题#

  • 移动分组时,分组所有的子项都要移动,且保持相对位置和关系不变
  • 批量移动未分组列表项到分组内时,相对位置应不变
  • 已分组列表项移动出分组范围时应,应解除分组关系

分析#

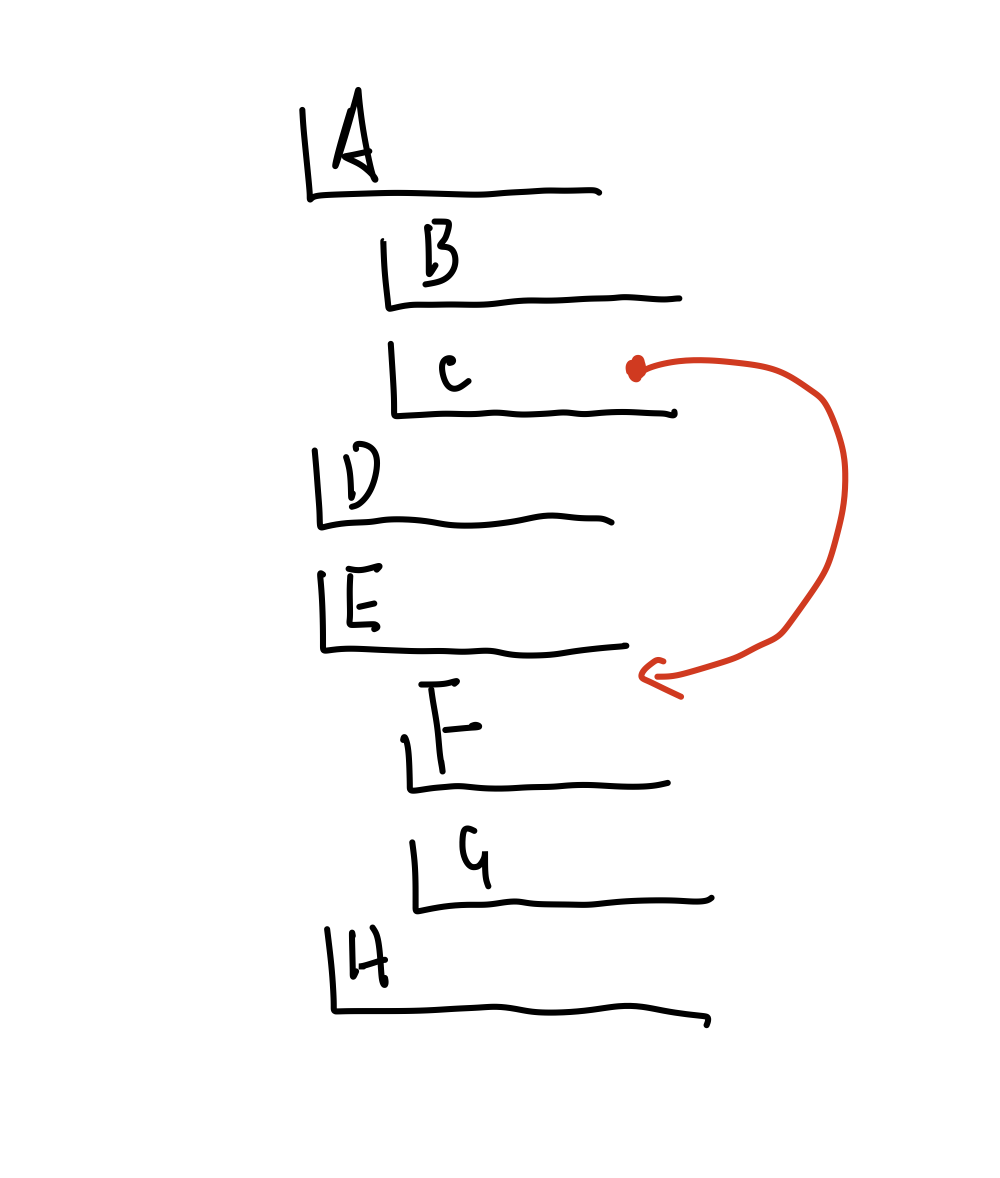
当分组移动时,所有分组的子项都不变,首先需要搜索到分组内所有的子项。然后记录该子项在分组内的相对位置,以及在整体列表中的位置。 这样在移动时,方便进行计算。

整体来讲,这个移动过程中的搜索部分将使用深度优先搜索的一种变种。移动后的排序,只需遵守搜索中分组和其子项的相对顺序遍历即可。

分组子项搜索流程如下:

1
2
3
4
5
6
7
8
9
10
11
12
13
14
15
16
17
if (!groupCache.includes(hasGroup)) {
//组件的分组不在查询的分组内。弹出所有的分组缓存
groupCache = [];
return;
} else {
result.push(item); //组件的分组在分组缓存中

if (hasGroup !== groupCache[groupCache.length - 1]) {
// 如果组件的分组不在缓存的顶层
const hasGroupCacheIndex = groupCache.indexOf(hasGroup);
groupCache = groupCache.slice(0, hasGroupCacheIndex + 1);
}
if (compDatas[item].compCode === 'group') {
// 组件本身是分组组件
groupCache.push(item);
}
}

列表项排序流程如下:

1
2
3
4
5
6
7
8
9
10
11
12
13
14
15
16
17
18
19
20
21
22
23
24
25
26
27
28
29
30
31

/**
* compDatas 所有的列表项{[code]:{ config: { [groupCode]:groupCode } } }
* topLestSelectComps 和第一个要移动的列表项在同级的组件(处理批量移动的情况),数据结构与compDatas一致
* nearLowBoundsGroup 将要移动列表项所在的分组的下界,数据结构与compDatas一致
*/
if (isToplest) {
//如果移动位置在插入区间的顶部,表明组件在最外层
topLestSelectComps.forEach((item) => {

result[item] = { newGroup: undefined, oldGroup: compDatas[item].config.groupCode };
return (compDatas[item].config.groupCode = undefined);
});

return result;
}
if (nearLowBoundsGroup !== firstCompPrev) {
//如果移动位置的下界的分组code不等于移动组件的code,则解除或更新分组关系
topLestSelectComps.forEach((item) => {
if (item !== nearLowBoundsGroup) {
result[item] = { newGroup: nearLowBoundsGroup, oldGroup: compDatas[item].config.groupCode };
compDatas[item].config.groupCode = nearLowBoundsGroup;
} else {
result[item] = { newGroup: compDatas[item].config.groupCode, oldGroup: compDatas[item].config.groupCode };
}
});
return result;
}
return result;
};
实现#

分组子项查询详细代码
    

    interface GroupConfigStruct {
      groupItemCode: string[];
    }

    interface groupMapValueStruct {
      //分组内组件相对于分组索引的偏移量
      offsetNumer: number;
      //分组的索引
      currentIndex: number;
    }

    /**
    *根据分组关系排序一维数组
    *@param compCodes 所有组件的code
    *@param compDatas 所有组件的数据
    */
    const sortListItem = (compCodes: string[], compDatas: JDV.State['compDatas']) => {
      const groupCodeCache = new Map();
      const result: string[] = [];

      /**
      *递归的回溯当前分组的前驱分组,更新前驱分组的长度偏移量
      *@param groupCode 分组组件的code
      *@param offsetNumber 分组长度的偏移量
      */
      const recursiveBacktracking = (groupCode: string, offsetNumber: number): null => {
        const parentGroupCode = compDatas[groupCode].config.groupCode;
        const belongGroup = groupCodeCache.get(groupCode) as groupMapValueStruct;
        groupCodeCache.set(groupCode, {
          //更新分组缓存,每此插入组件,偏移量+1
          ...belongGroup,
          offsetNumer: belongGroup.offsetNumer + 1,
        });
        if (parentGroupCode) {
          // 如果分组有父分组,回溯一步
          return recursiveBacktracking(parentGroupCode, offsetNumber + 1);
        } else {
          return null;
        }
      };
      compCodes.forEach((item, index) => {
        const group = compDatas[item].config.groupCode ? compDatas[item].config.groupCode : null;
        if (compDatas[item].compCode === 'group') {
          //如果组件是分组组件,将code推入分组缓冲内
          groupCodeCache.set(item, { offsetNumer: 0, currentIndex: index });
        }
        if (group) {
          //在分组内
          if (groupCodeCache.has(group)) {
            // 组件的分组在缓存中
            const belongGroup = groupCodeCache.get(group) as groupMapValueStruct;

            // 分组内组件插入的位置
            const targetIndex = belongGroup.currentIndex + belongGroup.offsetNumer;

            result.splice(targetIndex + 1, 0, item);
            recursiveBacktracking(group, belongGroup.offsetNumer);
          }
        } else {
          result.push(item);
        }
      });
      return result;
    };

    export default sortListItem;
    
  
分组移动后排序详细代码
    
    /**
 * 组件排序时处理分组的逻辑。
 * @param compCodes 所有组件的code
 * @param compDatas 所有组件的数据
 * @param code 当前组件code
 * @param destination 目标位置
 * @returns result {Result} 返回组件排序后的分组关系,用于分组关系变化后,处理分组的尺寸。
 */
export const groupResort = (
  compCodes: string[],
  selectedCompCodes: string[],
  compDatas: JDV.State['compDatas'],
  destination: number
): Result => {
  const isToplest = destination === 0;
  const isBottomlest = destination + 1 === compCodes.length - 1;
  const lowBounds = isBottomlest ? compCodes.length - 1 : destination + 1;
  const interval = compCodes.slice(0, lowBounds); //插入区间
  const intervalLastComp = compDatas[compCodes[lowBounds]];
  const nearLowBoundsGroup = interval.find((item) => intervalLastComp && item === intervalLastComp.config.groupCode); //插入区间最下面的分组段
  const firstCompPrev = compDatas[selectedCompCodes[0]] && compDatas[selectedCompCodes[0]].config.groupCode; // 第一个选中组件的分组
  const topLestSelectComps = selectedCompCodes.filter((item) => compDatas[item].config.groupCode === firstCompPrev); // 和第一个选中在同级的所有选中组件
  const result: Result = {};

  if (isToplest) {
    //如果移动位置在插入区间的顶部,表明组件在最外层
    topLestSelectComps.forEach((item) => {
      result[item] = { newGroup: undefined, oldGroup: compDatas[item].config.groupCode };
      return (compDatas[item].config.groupCode = undefined);
    });

    return result;
  }
  if (nearLowBoundsGroup !== firstCompPrev) {
    //如果移动位置的下界的分组code不等于移动组件的code,则解除或更新分组关系
    topLestSelectComps.forEach((item) => {
      if (item !== nearLowBoundsGroup) {
        result[item] = { newGroup: nearLowBoundsGroup, oldGroup: compDatas[item].config.groupCode };
        compDatas[item].config.groupCode = nearLowBoundsGroup;
      } else {
        result[item] = { newGroup: compDatas[item].config.groupCode, oldGroup: compDatas[item].config.groupCode };
      }
    });
    return result;
  }
  return result;
};


高性能分组列表设计(1)

高性能分组列表设计#

整体目标#

  1. 分组存在嵌套关系,且深度无理论上限
  2. 可以通过拖拽,将已分组元素拖出,接触分组关系
  3. 可以通过拖拽,将未分组元素拖入分组内,建立新的分组关系
  4. 未分组列表项移动时,会自动越过分组及其子组件
  5. 未分组列表项进行分组时,应保持分组前的相对顺序
  6. 已分组列表项,在解除分组时,应保持分组前的相对顺序
  7. 以上操作对直接操作分组时,也应有效(这里将分组也作为一个列表项进行操作) ## 分析
  • 由于目标1&5,数据结构应保持一维结构,即对象数组的形式。这样的数据结构,提供了列表项的基础顺序,方便在创建分组时保持列表项的相对顺序。
  • 对于目标2&3&5&6,在计算拖拽项是否建立/更新/删除分组关系时,应记录已分组列表项在组内的相对位置,方便在分组关系变化时,对列表的位置进行排序
  • 对于目标7,应把分组也作为列表项之一。提供“type”字段作为分组列表项和其他列表的区别,为后续可能拓展分组的展开/收起功能
  • 渲染列表时会使用一个多维结构的数据,方便递归的对列表进行渲染,对于jsx语法友好。 ## 数据结构设计

列表项数据结构

1
2
3
4
interface ListItem {
code: string;
groupCode: string;
}

列表数据结构

1
type List = ListImte[]

更新分组时的辅助数据结构

1
2
3
4
5
type GroupStack = {
groupCode: string;
index: number; // 分组真实的下标
offsetNumber: number // 分组的长度,方便记录分组内列表项的相对位置
}[]

用于react渲染的数据结构

1
2
3
4
5
interface AssistStruct {
code: string;
children?: AssistStruct[];
parentGroupCode?: string; //pop stack flag
}

算法选择#

一维对象数组转换成嵌套结构设计:#

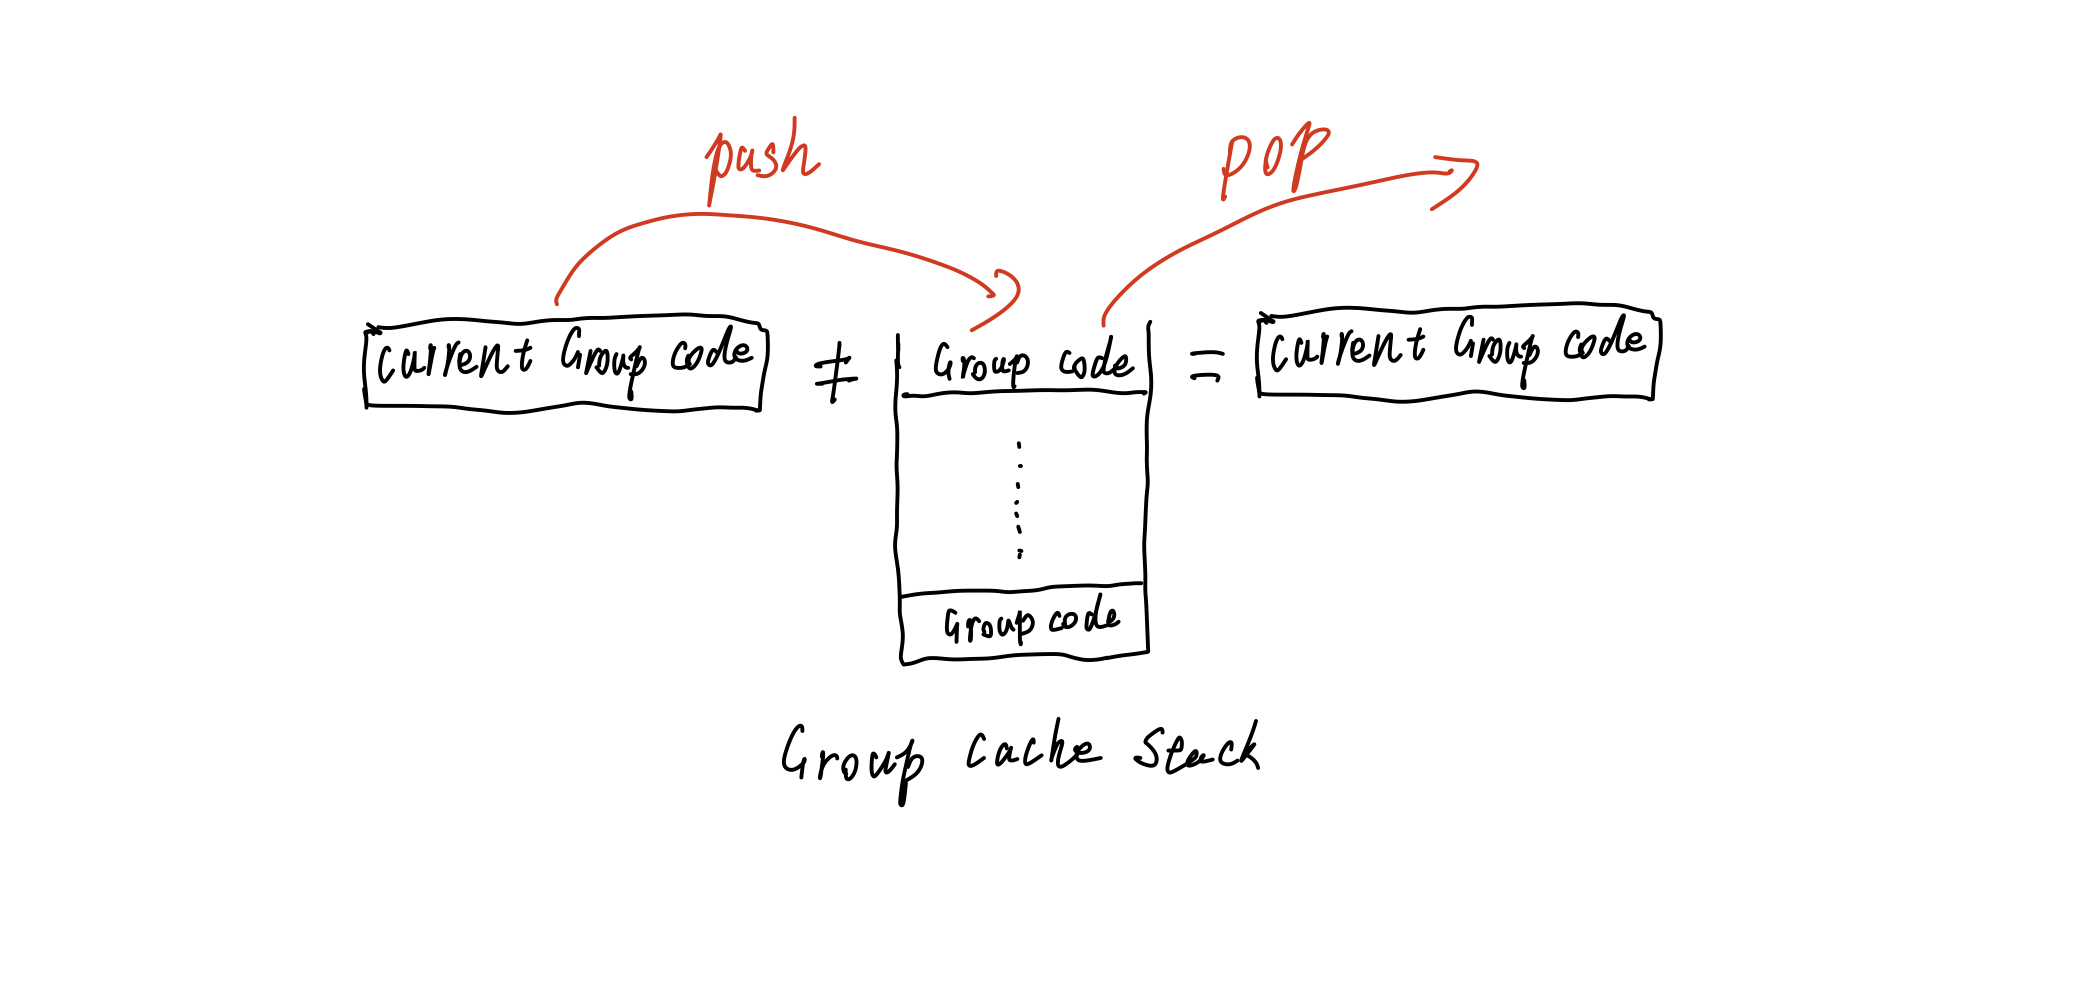
检测分组闭合,算法属于括号闭合算法的变种。

使用栈记录,未闭合的分组code。当前列表项中的group-code字段与栈顶的code不相等时,表示分组闭合,并且弹出当前栈顶元素。

具体实现#

一维对象数组转换成嵌套结构实现:#

1
2
3
4
5
6
7
8
9
10
11
12
13
14
15
16
17
18
19
20
21
22
23
24
25
26
27
28
29
30
31
32
33
34
35
36
37
38
39
40
41
42
43
44
45
46
47
48
49
50
51
52
53
54
55
56
57
58
59
60
61
62
63
64
65
66
67
68
69
70
71
72
73
74
75
76
77
78
79
80
81
82
83
84
85
86
87
88
89
90
/**
* 将一维数组转成多层结构
* @param compCodes 所有组件的code
* @param compDatas 所有组件的数据
* @returns 返回和code相关的嵌套结构、
*/
const subList = (compCodes: string[], compDatas: JDV.State['compDatas']): AssistStruct[] => {
let groupStack: GroupStack[] = [];
const resultData: AssistStruct[] = [];

const stackPop = (groupCode?: string) => {
let len = groupStack.length - 1;
while (len >= 0) {
if (groupStack[len].groupCode !== groupCode) {
groupStack.pop();
} else {
break;
}
len--;
}
};

const setResult = (result: AssistStruct[], groupStack: GroupStack[], groupCode: string, value: AssistStruct) => {
groupStack.forEach((item, index) => {
if (!result) {
return null;
}
if (!result[item.index]) {
return;
}
if (result[item.index].code !== groupCode) {
// 如果当前组件的分组不等于结果中的key,向下搜索
return setResult(result[item.index].children as AssistStruct[], groupStack.slice(index + 1), groupCode, value);
} else {
if (result[item.index].children) {
(result[item.index].children as AssistStruct[]).push(value);
item.offsetNumber += 1;
} else {
result[item.index].children = [value];
}
}
});
};

compCodes.forEach((item, index) => {
const hasGroup = compDatas[item] ? compDatas[item].config.groupCode : undefined;
stackPop(hasGroup);
if (compDatas[item].compCode === 'group') {
if (hasGroup) {
// 如果当前组件的父组件在栈顶,更新结果树
setResult(resultData, groupStack.slice(0), hasGroup, {
code: item,
children: [],
});

//如果当前分组有父分组,此时分组栈一定不为空,分组索引为父分组长度-1
// debugger;
groupStack.push({
groupCode: item,
index: groupStack.length ? groupStack[groupStack.length - 1].offsetNumber - 1 : index,
offsetNumber: 0,
});
} else {
groupStack = []; //没有分组,清空栈
resultData.push({
code: item,
children: [],
});
//如果当前分组没有父分组,此时分组栈一定为空,分组索引为结果长度
groupStack.push({
groupCode: item,
index: resultData.length - 1,
offsetNumber: 0,
});
}
} else {
if (hasGroup) {
// 如果当前组件的父组件在栈顶,更新结果树
setResult(resultData, groupStack.slice(0), hasGroup, {
code: item,
});
} else {
groupStack = []; //没有分组,清空栈
resultData.push({
code: item,
});
}
}
});
return resultData;

通过服务器在指定时间将网页录制成视频

通过服务器在指定时间将网页录制成视频#

为什么有这样的需求?#

笔者最近的工作在前端数据可视化领域,会出现一些对长时间运行的前端页面进行监控的需求。以往我的解决办法是通过一些现有的平台,在个人PC上通过浏览器进行录制,或者更早的方法是通过一些录屏工具进行录制。

在这样的方式中,经常会遇到以下问题:

  • 分辨率不够还原
  • 录制的日志格式难以解析
  • 需要长期的打开个人电脑
  • 通过平台录制的,往往不是视频,而是一段DOM-Mirror的记录。这样的记录很难分享给其他人进行问题排查
  • DOM-Mirror记录进行回放时,对于后端返回的实时数据渲染,缺少价值(因为当时的时间点已经错过了,回放时无法回放后端当时的服务状态)
  • 并发录制个数受限于个人电脑的性能
  • 录制后的文件不好管理

我的目标#

So,基于上述的需求,我们需要达到以下的要求:

  • 能在网页要求的原始分辨率情况下进行录制
  • 能在服务端而不是个人电脑上进行录制
  • 能录制通用的视频和日志文件,可以方便的分享给他人
  • 能进行并发录制
  • 视频帧数要足够流畅(至少4K下)
  • 为录制的文件提供静态资源访问服务

技术栈的选择#

  • 基础语言和框架——js&nodejs
  • 对于指定时间运行任务 —— cron job
  • 对于打开网页 —— puppeteer
  • 对于视频录制有以下备选方案
    • 使用浏览器api getDisplayMedia进行录制
    • 使用puppeteer按帧数截图,然后对图片用ffmpeg进行压制
    • 使用xvfb将虚拟桌面的视频流直接通过ffmpeg进行编码录制
  • 对于录制日志 —— puppeteer提供的devtools相关事件
  • 对于并发处理 —— 引入加权计算
  • 对于视频处理 —— ffmpeg

具体的实现方式#

一、现行方案#

该方案主要规避解决的问题:#

  • 使用 getDisplayMedia时,受到浏览器的协议限制。这个api只在访问协议为https下可用,且音频的录制需要依赖其他的api。
  • getDisplayMedia的性能,在多网页并发录制时优化空间小,而且最致命的问题时,录制过程的性能开销,是由浏览器负担的。这意味着,如果页面本身对性能比较敏感,使用这个api基本无法录制出网页正常运行的情况。
  • puppeteer按帧数截图受到了chrome-devtools本身的限制,导致一秒只能截取出10+图。在数据可视化的场景中,大量的实时数据渲染,显然也是无法接受的。

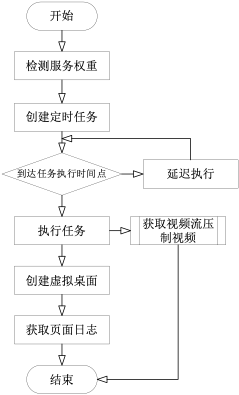
核心流程#

关键点:#

  1. 使用node调用xvfb,创建虚拟桌面:开源库node-xvfb存在一些问题,创建的虚拟桌面,似乎共享了同一个流的缓冲区,在并发录制时,会出现抢占的情况,导致视频内容出现加速,所以需要封装一个新的node调用xvfb的功能
1
2
3
4
5
6
7
8
9
10
11
12
13
14
15
16
17
18
19
20
21
22
23
24
25
26
27
28
29
30
31
32
33
34
35
36
37
38
39
40
41
42
43
44
45
46
47
48
49
50
51
52
53
54
55
56
57
58
59
60
61
62
63
64
65
66
67
68
69
70
71
72
73
74
75
76
77
78
79
80
81
82
83
84
85
86
87
88
89
90
91
92
93
94
import * as process from 'child_process';
class XvfbMap {
private xvfb: {
[key: string]: {
process: process.ChildProcessWithoutNullStreams;
display: number;
execPath?: string;
};
} = {};

setXvfb = (key: string, display: number, process: process.ChildProcessWithoutNullStreams, execPath?: string) => {
this.xvfb[key] = {
display,
process,
execPath,
};
};

getSpecXvfb = (key: string) => {
return this.xvfb[key];
};

getXvfb = () => this.xvfb;
}

const xvfbIns = new XvfbMap();

/**
* 检测虚拟桌面是否运行
* @param num 虚拟桌面窗口编号
* @param execPath 内存缓冲文件映射路径
* @returns Promise<boolean>
*/
const checkoutDisplay = (num: number, execPath?: string) => {
const path = execPath || '/dev/null';
return new Promise<boolean>((res, rej) => {
const xdpyinfo = process.spawn('xdpyinfo', [
'-display',
`:${num}>${path}`,
'2>&1',
'&&',
'echo',
'inUse',
'||',
'echo',
'free',
]);
xdpyinfo.stdout.on('data', (data) => res(data.toString() === 'inUse'));
xdpyinfo.stderr.on('data', (data) => rej(data.toString()));
});
};

const getRunnableNumber = async (execPath?: string): Promise<number> => {
const num = Math.floor(62396 * Math.random());
const isValid = await checkoutDisplay(num, execPath);
if (isValid) {
return num;
} else {
return getRunnableNumber(execPath);
}
};

export const xvfbStart = async (
key: string,
option: { width: number; height: number; depth: 15 | 16 | 24 },
execPath?: string
) => {
const randomNum = Math.floor(62396 * Math.random());
const { width, height, depth } = option;
try {
const xvfb = process.spawn('Xvfb', [
`:${randomNum}`,
'-screen',
'0',
`${width}x${height}x${depth}`,
'-ac',
'-noreset',
]);

xvfbIns.setXvfb(key, randomNum, xvfb, execPath);
return randomNum;
} catch (error) {
console.log(error);
return 99;
}
};

export const xvfbStop = (key: string) => {
const xvfb = xvfbIns.getSpecXvfb(key);
return xvfb.process.kill();
};

export default xvfbIns;

  1. 服务器并发录制时进行负载均衡。这个功能是为解决并发录制视频编码时,服务器CPU的负载过高问题。所以为了尽可能的提高并发录制数量,我记录了每个服务器正在和将要执行的任务数量,将这个数量标记为服务的权重,当创建一个新的录制任务时,先检测当前服务器的权重,然后在权重最低的服务器上创建录制任务,并在录制完成和手动终止任务时,降低权值。
1
2
3
4
5
6
7
8
9
10
11
12
13
14
15
16
17
18
19
20
21
22
23
24
25
26
27
28
29
30
31
32
33
import { CronJob } from 'cron';

interface CacheType {
[key: string]: CronJob;
}

class CronCache {
private cache: CacheType = {};
private cacheCount = 0;
setCache = (key: string, value: CronJob) => {
this.cache[key] = value;
this.cacheCount++;
return;
};

getCache = (key: string) => {
return this.cache[key];
};

deleteCache = (key: string) => {
if (this.cache[key]) {
delete this.cache[key];
}

this.cacheCount = this.cacheCount > 0 ? this.cacheCount - 1 : 0;
};

getCacheCount = () => this.cacheCount;
getCacheMap = () => this.cache;
}

export default new CronCache();

  1. 启动puppeteer时,需要提供一系列参数

    1
    2
    3
    4
    5
    6
    7
    8
    9
    10
    11
    12
    13
    14
    15
    16
    17
    18
    19
    20
    21
    22
    const browser = await puppeteer.launch({
    headless: false,
    executablePath: '/usr/bin/google-chrome',
    defaultViewport: null,
    args: [
    '--enable-usermedia-screen-capturing',
    '--allow-http-screen-capture',
    '--ignore-certificate-errors',
    '--enable-experimental-web-platform-features',
    '--allow-http-screen-capture',
    '--disable-infobars',
    '--no-sandbox',
    '--disable-setuid-sandbox',//关闭沙箱
    '--start-fullscreen',
    '--display=:' + display,
    '-–disable-dev-shm-usage',
    '-–no-first-run', //没有设置首页。
    '–-single-process', //单进程运行
    '--disable-gpu', //GPU硬件加速
    `--window-size=${width},${height}`,//窗口尺寸
    ],
    });

方案性能(docker中)#

  • 标准1k分辨率下:双核CPU 2.3Ghz; 4G ram下,并发数10个
  • 标准2k分辨率下:双核CPU 2.3Ghz; 4G ram下,并发数4个

二、尝试过的方案#

getDisplayMedia模式#

关键点#
  1. 该api的调用,会导致chrome弹出选择具体录制哪个网页的交互窗口。关闭这个窗口需要在启动puppeteer时启用以下参数

    1
    2
    3
    4
    5
    6
    7
    8
    9
    '--enable-usermedia-screen-capturing',
    `--auto-select-desktop-capture-source=recorder-page`,
    '--allow-http-screen-capture',
    '--ignore-certificate-errors',
    '--enable-experimental-web-platform-features',
    '--allow-http-screen-capture',
    '--disable-infobars',
    '--no-sandbox',
    '--disable-setuid-sandbox',
  2. 执行录制时,需要通过puppeteer page.exposeFunction注入函数进行执行。

Q&A#

Q:为什么要引入xvfb?

A:在尝试的方案中,getDisplayMedia需要运行环境提供一个桌面环境。在现行方案中,则是需要把xvfb的视频流直接推入到ffmpeg中

Q:为什么对内存有一定要求?

A:提供chrome的最小运行内存

项目地址#

https://github.com/sadofriod/time-recorder